5 Easy Ways to Revive Dying Plants
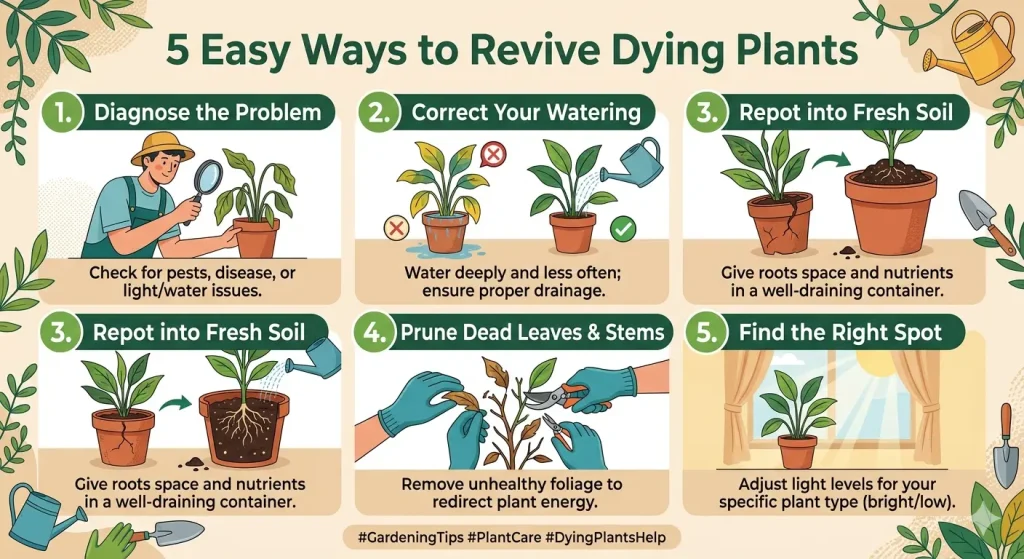
Watching a once-healthy plant slowly die is one of the most depressing things that can happen. Seeing dying leaves, drooping stems, or stunted growth can make you feel like a failure, no matter how long you’ve been gardening or how new you are to the plant world. If you act quickly and appropriately, you can salvage most dying plants.
The secret to bringing plants back to life is knowing what they are trying to say. Plants show signs of illness, and once you learn to recognize them, you can take steps to help. This thorough book will show you five tried-and-true ways to bring dying plants back to life, along with step-by-step directions, common mistakes to avoid, and expert advice that will make you a plant-saving superhero.
Understanding Why Plants Die: The Foundation of Revival
It’s important to know that plants usually don’t die overnight before learning how to bring them back to life. Plant decline normally happens slowly and is caused by one or more stress factors, such as not getting enough water, light, nutrients, or pests or disease. Plants are wonderful because they can bounce back from almost anything. Most plants can come back from the edge of death if they are in the appropriate conditions.
Now, let’s look at the five best techniques to bring your plants back to life.
1. Master the Art of Proper Watering: Finding the Goldilocks Zone
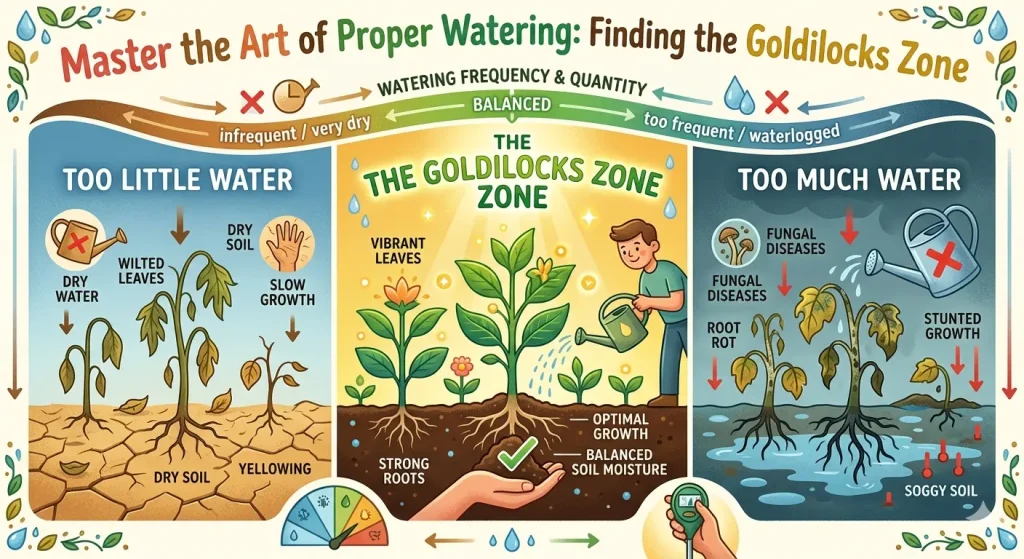
About 80% of houseplant problems are caused by watering issues; thus, this is the most important thing to do to bring your plants back to life. Overwatering and underwatering can cause the same issues, so it’s vital to know your plant’s needs.
Finding Problems with Water
Signs that you are watering too much include yellowing leaves (especially the lower ones), stems that are soft and mushy, soil that smells moldy, fungus gnats flying around the plant, and leaves that are wilted even though the soil is damp. Overwatering is especially hazardous since it causes root rot, which means your plant’s roots drown and can’t take in oxygen.
Signs of underwatering include dry, crispy edges on leaves, leaves that are twisted or wrinkled, leaves that fall off quickly, soil that pulls away from the pot edges, and wilting that gets better for a short time after watering. It is easier to cure underwatering than overwatering, but prolonged dehydration can harm plant tissues for ever.
The Plan for Revival
For plants that have been irrigated too much:
First, cease watering right away and check for damage. Carefully take the plant out of its pot and look at its roots. Healthy roots should be white or light tan and feel firm. If the roots are black, brown, or mushy, they are rotting and need to be cut off.
Cut off all the rotten roots with clean, sharp scissors or pruning shears that have been cleaned with rubbing alcohol. Be tough here; it’s better to cut out roots that might be bad than to leave rot that will spread. The plant’s prospects of living are limited if more than 75% of its roots are injured, but don’t give up yet.
After cutting it back, put the plant in new soil that drains well. This is not up for debate: pick a pot with enough drainage holes. To help with drainage, you could add perlite, orchid bark, or coarse sand to the potting mix (approximately 1 part amendment to 3 parts potting soil). After repotting, water the plant only enough to settle the dirt. Then wait until the top inch or two of soil is fully dry before watering again.
If your plants aren’t getting enough water:
The answer here is simpler, but it takes time. If a plant is very dehydrated, don’t soak it all at once because the water will just pass through it without being absorbed. Instead, give the plant a lot of water slowly so that it can absorb it.
If the soil is too dry, try the bottom-watering method: put the whole pot in a basin or sink with a few inches of water and let it sit for 30 to 60 minutes. The soil will soak up water from the bottom up, which will make sure that the liquid is spread out evenly. When the soil surface feels wet, you will know it’s working.
Establish a regular watering schedule that satisfies your plant’s needs after this initial watering. The “finger test” is an invaluable tool. Insert your finger into the soil until it reaches the second knuckle. Most houseplants need water if the soil feels dry at that depth. Succulents and cacti like the soil to be entirely dry, whereas ferns and tropical plants like it to be a little bit wet.
Tips for Watering Like a Pro
Buy a moisture meter for less than $10 to make watering easier, especially while you’re still learning. Water in the morning so that any extra moisture on the leaves can dry up during the day. This will keep fungus from growing. Use water that is at normal temperature, because cold water can shock roots. Finally, always water the plants well until water drains from the bottom holes. Watering too little fosters weak, shallow root systems.
2. Optimize Light Conditions: Give Your Plant the Energy It Needs
Plants eat light. Plants use photosynthesis to turn light energy into the sugars they need to grow, fix damage, and keep their important functions going. Plants will starve if they don’t get enough light, no matter how well you water and fertilize them.
Finding Out What’s Wrong with the Light
If a plant doesn’t get enough light, it will grow lanky and stretched as it seeks light sources. Its leaves will be thinner and paler than normal, and patterned plants will lose their variegation. The plant will lean significantly toward a light source and grow slowly or not at all.
Too much light (which is less common inside but can happen near south-facing windows) shows up as burned or bleached spots on leaves, leaves that curl inward, brown crispy edges or tips, and wilting during the hottest parts of the day even though the plant has enough water.
The Strategy for Revival
Please begin by researching the specific light requirements of your particular plant. Plants can be divided into three main groups:
Plants that don’t need much light, such as pothos, snake plants, and ZZ plants, grow well in north-facing windows or a few feet away from east or west windows. They can handle both low and bright light.
Most houseplants, such as philodendrons, peace lilies, and spider plants, need bright, indirect light from windows that face east or west. They also want to be a few feet away from a south-facing window with sheer curtains.
Cacti, succulents, fiddle leaf figs, and bird of paradise are examples of high-light plants that demand direct sunlight or very brilliant indirect light, usually from windows that face south in the Northern Hemisphere.
If your plant isn’t getting enough light, you can resolve the problem by moving it closer to a window or to a place that is brighter. But take your time with this change, especially with plants that have been in low light for a long time. Sudden exposure to strong light can shock a plant and burn its leaves. Over the course of a week or two, move the plant a little bit closer to the light source.
Invest in grow lights if you don’t receive enough natural light. LED grow lights are energy-efficient, don’t get very hot, and come in beautiful forms that appear like conventional lamps. For optimal results, place grow lights 6 to 12 inches above your plant and leave them on for 12 to 16 hours per day.
If your plants are getting too much light, move them away from the window, use sheer curtains to block some of it, or put them in a place with less light. Cut off any seriously damaged leaves to let the plant focus its energy on new growth.
The Light Schedule Plan
Remember that plants also need gloom. For their bodies to work properly, most houseplants need 8 hours of darkness. Set a timer for your grow lights to make sure they stay on all the time. Plants do best when they have a regular schedule, and regular light cycles help keep their internal processes in check.
3. Prune Strategically: Help Your Plant Redirect Its Energy
A struggling plant expends energy attempting to maintain damaged or dying leaves. Strategic pruning gets rid of these energy drains and tells the plant to generate new, healthy parts. When you resolve the problems that are causing the issues, this method works even better, as it allows the plant to focus its energy on recovery and growth rather than on maintaining unhealthy leaves.
Knowing What to Cut
You shouldn’t take out all the dying pieces right away. You should absolutely get rid of any leaves that are dead or decaying, have brown or crispy tips and edges, are sick or have been harmed by pests, have lanky stems with little foliage, or are mushy or rotting. But leaves that are turning yellow yet remain partly green may still aid in photosynthesis, so use your best judgment.
The Plan for Revival
Get your equipment ready: clean, sharp pruning shears or scissors, rubbing alcohol to kill germs, and a clean cloth. To stop the transmission of disease, clean your cutting equipment before and after each cut.
If the tips or edges of the leaves are brown, you can trim just the damaged part, following the natural form of the leaf for a better look. Cut at a small angle so that water doesn’t collect on the cut surface.
To cut back whole leaves or stems, cut them back to just above a leaf node (the bulge on the stem where leaves come out) at a 45-degree angle. This helps things grow from that point on. If the stems are fully dead, follow them back to live tissue. You’ll see a color change from brown/black to green. Cut slightly above that point.
If your plant has lost more than half of its leaves, you may need to do a severe pruning. This extreme step means pruning the plant back a lot, perhaps to just a few inches above the soil line. This may seem excessive, but many plants, such as pothos, philodendron, peace lilies, and most herbs, respond quite well to hard pruning by growing new, strong stems. But first, look up your specific plant, because some kinds (like most palms) won’t grow back after being cut back too far.
The Care After
Don’t fertilize right after pruning; wait at least 2 to 4 weeks. The plant should focus on getting better, not growing. Cut back on watering slightly because the plant needs less water due to having fewer leaves to maintain. To facilitate the plant’s healing, place it in the optimal lighting conditions (as outlined in procedure #2). In a few weeks, you should see new growth emerging from the nodes where you made the cuts.
Tips for Professional Pruning
Always cut slightly above a node, not between nodes, because such cuts can kill the stem. Don’t take away more than 30% of the plant at a time unless you’re executing a rescue hard prune on a plant that is very damaged. Healthy cuttings can be used to grow new plants. Perhaps you could consider creating backup plants while you’re cutting? Finally, while you work, take a moment to assess the plant’s overall shape. Pruning is both calming and artistic.
4. Address Nutrient Deficiencies: Feed Your Hungry Plant
Plants that are in pots can’t get as much nutrients as plants that are in the ground. They deplete their potting soil’s nutrients over time, and if they don’t get more, they show deficiency. But the timing and type of fertilization are crucial. Fertilizing a plant at the wrong time or in the wrong way can harm it.
Finding Nutrient Deficiencies
Different nutritional deficits cause different symptoms:
Lack of nitrogen: The older leaves turn yellow, but the veins stay green. The plant looks pale overall, and its growth is hindered. For leaves to grow and plants to be healthy, nitrogen is essential.
If there isn’t enough phosphorus, the leaves turn purple or red, the roots don’t grow well, and the stems are feeble. Phosphorus helps roots develop and flowers bloom.
Lack of potassium: Leaves with yellow or brown edges and tips, weak stems, and a low ability to fight illness. Potassium makes plant tissues stronger and controls how much water they take up.
Iron deficiency: New leaves turn yellow while veins stay green (interveinal chlorosis). This condition is especially common in plants that like acid and grow in alkaline soil.
Not enough calcium: new growth that is bent and dark spots on leaves. This condition is more common in vegetables than in houseplants.
The Plan for Revival
Important: Avoid fertilizing a plant that is currently experiencing significant stress. If your plant has root rot, is very dry, or has bugs, you should resolve those problems first. If you fertilize a plant with roots that are already injured, the fertilizer might burn the roots and worsen them.
Start a light fertilization program once you’ve dealt with the immediate problems and the plant seems like it’s getting better (usually after 2–4 weeks):
Pick the proper fertilizer: For general rejuvenation, use a balanced, water-soluble fertilizer with an NPK ratio of 10-10-10 or 20-20-20. Choose a fertilizer that is high in nitrogen for leafy development, high in phosphorus for blooming plants, and so on, depending on what your plants need. Fish emulsion, compost tea, and worm castings are all organic solutions that are kinder and give plants micronutrients.
Start with half-strength: Mix your fertilizer with half the amount of water that is suggested. Plants that are stressed need nutrients, but they can’t use them as well as healthy plants can, which means that providing the right nutrients at the right time is crucial for their recovery and growth.
Timing is important: Fertilize during the growing season (spring and summer for most houseplants) when the plant can consume the nutrients. Most houseplants don’t need any fertilizer at all during the fall and winter while they are dormant.
How to use: First, water your plant well with ordinary water, and then use the diluted fertilizer solution. This keeps the roots moist, which stops fertilizer burn. Most houseplants need fertilizer every 2 to 4 weeks during the growing season.
The Alternative to Soil Refresh
Fresh dirt is sometimes the greatest way to add nutrients. If your plant has been in the same soil for over two years, consider repotting it with a new, high-quality mix. This quickly adds nutrients back into the soil and typically fixes more than one problem at once. Pick a pot that is only 1 to 2 inches bigger in diameter than the one you have now. If you have too much extra room, you might water too much.
5. Check for and Eliminate Pests and Diseases: Address Hidden Problems
Your plant might not be dying because of the weather; it can be under attack. Pests and diseases can kill a plant rapidly, but the good news is that acting soon usually works quite well.
Common Plant Pests and What They Look Like
Spider mites: Leaves with fine webbing, small moving spots on the undersides of the leaves, and leaves that are stippled or bronzed. They do well in dry weather.
Mealybugs: White, cottony clusters on the axils and stems of leaves, sticky honeydew on the leaves, and growth that is stunted.
Aphids are little, soft-bodied bugs that live in groups on new growth, twisted or bent leaves, and sticky residue.
Fungus gnats are small flying bugs that live in the soil and appear like tiny worms. They usually mean that the soil is too wet.
Scale insects: Brown or tan lumps on stems and leaves, sticky leaves, and leaves that are fading.
The Plan for Revival
Immediate isolation: As soon as you see pests, put the damaged plant in a separate area away from your other plants to stop the spread.
The spray treatment: Mix 1 quart of water with 1 tablespoon of mild liquid soap (not detergent) to make an insecticidal soap spray that will kill most common pests. To help it stick, add a teaspoon of vegetable oil. Spray the solution thoroughly on all surfaces, ensuring that you cover the undersides of the leaves and the stems. Do this treatment every 5–7 days for three weeks to catch all the life cycles.
The neem oil solution: Neem oil is a natural pesticide that works on most common houseplant pests. Follow the package guidelines for mixing (typically 2 tablespoons per gallon of water) and spray well. To keep the leaves from burning, use it at night and again every week.
For severe infestations, put a cotton swab in rubbing alcohol and use it to directly kill pests you can see, like mealybugs and scale. The alcohol breaks down their protective layer and kills them right away. To get rid of spider mites, make the air around the plant more humid and wash the leaves often with a strong stream of water.
Systemic treatments: If the problem keeps coming back, think about using systemic pesticides that the plant takes in through its roots. These treatments provide internal protection to the entire plant and can last for weeks or even months.
Controlling Diseases
Environmental problems including too much water, insufficient air circulation, excessive humidity with low light, and too much light can cause fungal and bacterial infections. While treating the ailment, address the underlying cause:
If you have fungal problems like powdery mildew or leaf spots, get rid of the leaves that are afflicted, promote air circulation, and use a fungicide or a homemade solution of 1 tablespoon of baking soda combined with 1 gallon of water and a dab of dish detergent.
For root rot, we discussed the details in the watering section, but it’s worth repeating: take out the rotted roots, put the plant in new soil, and change how you water it.
Creating the Perfect Recovery Environment
In addition to these five main approaches, making the best recovery environment for your plant can help it come back:
Keep things the same: Plants heal better when they stay the same. Don’t move them around, keep the temperature stable (most houseplants like it between 65 and 75 degrees Fahrenheit), and stick to your maintenance routine.
Increase the humidity: Most houseplants like it when the humidity is between 40% and 60%. Put a pebble tray (a shallow tray with pebbles and water) under the container, bunch plants together, or run a humidifier nearby.
Make sure there is good air circulation: It keeps stems strong and stops fungal problems. A little fan on low or just opening windows now and then can assist.
Be patient; it takes time for plants to get better. Miracles won’t happen immediately. Most plants start to get better within 2 to 4 weeks, but it can take 2 to 3 months or longer for them to fully recover.
Conclusion: You've Got This
One of the best things about being a plant parent is bringing a dying plant back to life. It teaches you to pay close attention, respond in the right way, and have faith in nature’s might. Keep in mind that even gardeners who have been at it for a long time lose plants periodically. It’s just part of the learning process.
The five approaches we’ve spoken about—getting the watering right, getting the light right, cutting back on plants at the right times, giving them the right food, and getting rid of pests—make up a complete set of tools for bringing plants back to life. The most important thing is to make an accurate diagnosis and then give the right treatment. Start by identifying the issue, then tackle it at its source, and finally, ensure your plant receives the ideal conditions for recovery.
Track what works best for your plants as you apply these tips. Every home is different, and so are the needs of each plant. You’ll learn over time what your plants require and when they need it without having to think about it.
Your plant dying isn’t a failure; it’s a chance to learn more and get better at taking care of plants. You now know how to turn those sickly plants into healthy green friends with the methods described in this article. So get ready to see your plant pals come back to life in a way that will wow you. Happy planting!