4 Secret Outdoor Plant Watering Hacks
Allow me to share a lesson that took me considerable time to learn independently.
I killed more plants than I want to remember when I started gardening. I watered them every day and stood there with my hose like a caring mom, but my tomatoes still wilted, my roses drooped, and my herbs turned into sad little brown sticks sticking out of the ground.
Does this scenario sound familiar?
Here’s the deal: I wasn’t giving my plants too little water. I did it wrong. And it’s a difference that most gardening books don’t try to explain.
The truth is that watering plants outside is more than just giving them water. It’s all about how you deliver the water, when you deliver it, where you send it, and what smart methods you can employ to make every drop matter.
I’ve learned a lot over the years by trying things out, talking to professional gardeners, and doing a lot of study. I’ve put everything I’ve learned into four strong watering hacks that most people don’t know about. These aren’t the same old “water in the morning” suggestions that you see in every other basic gardening article. These are real, science-based, and field-tested ways to transform the way you think about watering your outdoor plants.
These tips will help you save time, water, and most importantly, your plants, whether you’re growing vegetables in your backyard, taking care of flower beds, container plants on your patio, or a large landscape.
Let’s get started.
The Deep Soak Method — Train Your Plant Roots to Grow Stronger
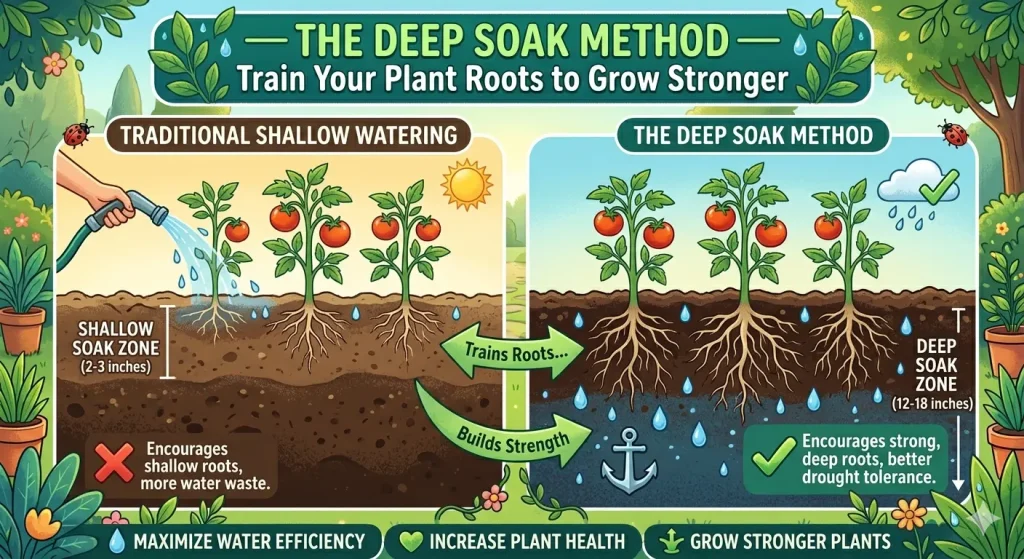
This is arguably the most crucial idea regarding watering that no one talks about. When I finally got it, it revolutionized the way I gardened.
Many people give their garden plants a little water every day. They go outdoors, splash each plant quickly, and feel satisfied about themselves. But here’s what really happens below the surface, in a literal sense.
Only the top inch or two of soil gets wet when you water softly and often. The water never gets deep enough to get to the lower root zone. What do your plants do, then? They change. Instead of going deep into the ground where they belong, their roots tend to grow up toward the surface where the water is.
This is a terrible problem.
Plants with shallow roots are fragile. They don’t like heat. If you don’t water them for a day, they won’t live. They can’t get to the nutrients that are deeper in the soil. They rely on you to bring that hose every day, and if you forget or go on vacation, everything falls apart.
The trick is to water less often but more thoroughly.
Instead of watering your plants every day, give them a lengthy, gradual soak two or three times a week. For most plants, the idea is to get water down at least 6 to 8 inches into the soil. For trees and big shrubs, it should go even deeper.
Here’s how to do it in real life:
Use a gentle flow. Set your hose to a slow stream and let it flow at the base of each plant for a few minutes. You don’t want the water to flow off the surface; you want it to soak in slowly. If you notice water accumulating on the ground and then flowing away, you’re putting it on too rapidly.
Look at your depth. Wait about 30 minutes after watering before pushing a screwdriver or a long rod into the ground near your plant. It should slip in smoothly into wet soil. If it stops or is difficult to push after a few inches, you haven’t watered it thoroughly enough.
Let the ground dry out between waterings. The uncertainty is the part that makes folks afraid. You should wait until the top layer of soil has dried off before watering again. This approach isn’t ignoring someone; it’s teaching them. When the surface dries but there is still water deep down, roots have to chase the water down. In a few weeks, you’ll have a strong, deep, and flexible root system.
I recall the first summer I decided to do this. While my tomato plants thrived, my neighbor’s garden struggled with the heat. It wasn’t the different kinds of tomatoes or the fertilizer that made the difference. It was the roots. My plants had learned how to access water deep in the ground, which was unavailable to plants that only received water from the surface.
If your soil is clay, you’ll need to water even more carefully because clay doesn’t soak up water very rapidly. You might need to water your plants more often if you have sandy soil because sand drains quickly. Find out what kind of soil you have and make changes as needed.
The deep soak method has another great benefit: it stops weeds from growing rapidly. Weeds like to grow in topsoil that stays wet all the time. Allowing the surface to dry out between deep waterings makes it difficult for weed seeds to germinate while benefiting the plants that are already established.
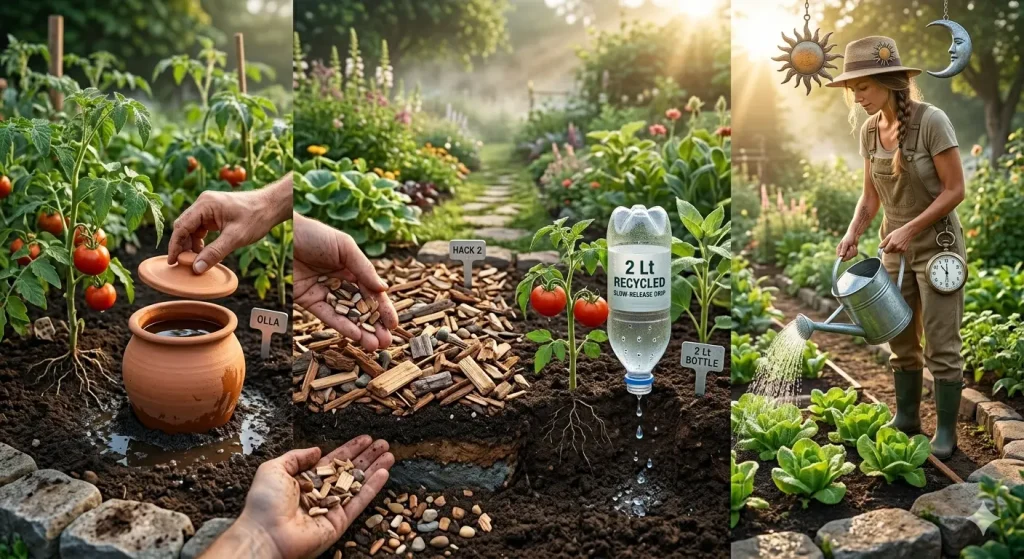
The Buried Bottle Irrigation System — A DIY Drip System That Costs Almost Nothing
An old man who had been gardening in the Arizona desert for more than forty years taught me this trick. He had a beautiful garden in one of the hardest climates in the country. When I inquired about his method, he led me to his tomato bed and removed some mulch to reveal the top of a plastic bottle that was buried in the ground.
The method is so simple and works so well that it could be embarrassing. All it costs you is a few minutes and some old bottles.
This is how it works:
Use a clean plastic bottle. A 2-liter soda bottle works well for most plants, but a 1-liter bottle works better for smaller plants and containers. With a nail, a thumbtack, or a small drill bit, make 4 to 8 small holes in the sides and bottom of the bottle. The openings should be small so that the water doesn’t gush out.
Now, dig a hole next to your plant (4 to 6 inches away from the stem) and bury the bottle so that just the top neck sticks out of the dirt. Take off the cap; you’ll be filling the bottle from the top.
When it’s time to water, just fill the bottle with water from your hose or watering can. The little openings will let the water slowly seep out into the root zone of your plant over the course of a few hours.
What makes this work so well?
First, it sends water straight to the roots of plants, which are underground. The water doesn’t sit on the soil surface where the light and wind can access it; thus, there is almost no evaporation loss.
Second, it emits moisture slowly and steadily. The buried bottle doesn’t let out a lot of water all at once. Instead, it lets out water slowly, giving the soil time to soak up every drop. This method is basically a free way to water plants by dripping.
Third, it keeps the leaves dry. Many gardeners don’t pay attention to this issue, yet it’s a big concern. When you water plants from above, such as with a sprinkler or by splashing the hose around, the leaves get moist. Fungal diseases like powdery mildew, black spot, blight, and leaf rust love it when leaves are wet in warm weather. The buried bottle method keeps all the water where it belongs: underground.
I’ve employed this method on my veggie garden outside, and the results have been wonderful. My pepper plants, in particular, did really well. When I started watering their roots in this manner, they transformed from being average producers to tremendous powerhouses.
Making the garden bigger:
You can apply this strategy in all parts of your garden. Put one bottle next to each big plant, or space them out along a row of smaller plants, every 18 to 24 inches. Use bigger containers for bigger plants or trees. For example, gallon jugs or even 5-gallon buckets with holes punched in them work well.
A different kind of container plant:
You can use a smaller bottle, like a wine or beer bottle, filled with water and turned upside down into the soil if you grow plants in big pots or containers outside. As the earth dries, the water will slowly come out. When you’re away for a few days, this technique is an excellent way to keep your pots hydrated.
Here are some tips for maintaining the bottle in excellent condition:
Take the bottles out every few weeks and examine the holes. Roots could grow toward the bottle and block some holes. Such growth is a positive indication because it signifies your plants are discovering the water supply. Please remove any obstructions and rebury the bottle.
Some gardeners wrap the bottle with landscape cloth before burying it. The cloth keeps dirt from getting into the holes but still lets water through. This extra step can make maintenance inspections happen less often.
The Mulch Moisture Lock — Nature's Most Underrated Water Conservation Tool
Without mulch, you waste up to 70% of the water you use on outdoor plants.
That’s hardly an overstatement. Research from university extension programs all around the country has revealed that bare soil that is exposed to direct sunshine can lose a huge amount of moisture through evaporation. If you don’t mulch your soil, the top few inches might dry up completely in just a few hours after watering in hot weather.
Mulch is the answer, and it seems like it shouldn’t work because it’s so easy. But when you see how much it helps, you’ll believe it.
But here’s the trick: not all mulch is the same, and how you use it is critical.
The correct amount of mulch:
Most folks either don’t use mulch at all or put down a thin, weak covering that doesn’t help much. To keep moisture in, you need 3 to 4 inches of organic mulch around your plants. Insufficient mulch allows sunlight to penetrate the soil surface, undermining its effectiveness. If you go further than 5 or 6 inches, you could have problems with air circulation and perhaps kill shallow root systems.
The correct kinds of mulch:
The finest mulches for keeping moisture in outdoor gardens are
- Shredded hardwood bark is excellent for flower beds and the areas surrounding trees and bushes. It holds together well and doesn’t blow away quickly.
- Not hay, but straw: Great for vegetable gardens. It’s light, easy to use, and breaks down to add nutrients to the soil. Use straw instead of hay since hay has seeds in it that will grow weeds in your garden.
- Wood chips are excellent for paths and around trees that are already there. They last longer because they take longer to break down.
- Shredded leaves: Free and very useful. You can get as much high-quality mulch as you like every fall if you have deciduous trees. Run the leaves through a mower or leaf shredder, then spread them out thickly.
- Compost: A little layer of compost on top of your mulch achieves two things: it keeps the soil moist and feeds your plants.
Where to put the correct mulch:
People make blunders here. There should always be a 2- to 3-inch space between the mulch and the stem or trunk of your plant. When mulch is heaped right up against stems, it makes the area wet, which attracts pests, rot, and disease. Those “mulch volcanoes” that you see surrounding trees in commercial landscaping are one of the worst things you can do. Keep the mulch in a donut shape away from the trunk.
The secret method for keeping moisture in:
Most folks don’t know about this true hack. First, water, then mulch. Before mulching, wet the ground if it’s your first time or you’re refilling. This keeps the moisture in from the start and produces a moisture reservoir right away under the mulch layer.
Furthermore, give your mulched beds a gradual, long drink of water. Mulch can absorb and store water before it reaches the soil, but it also prevents evaporation. Water long enough for it to reach the root zone through the mulch.
The benefits of mulch are interconnected and cumulative:
In addition to holding moisture, mulch has many other features that make watering more efficient:
- Regulating temperature: In the summer, mulch keeps the soil cooler, while in the winter, it keeps it warmer. Cooler soil implies less water loss and less heat stress on roots.
- Improving the structure of your soil: When organic mulch breaks down, it provides organic matter to your soil. Soil that has a lot of organic matter in it holds water better than soil that doesn’t. Every year you mulch, your soil’s ability to hold water naturally gets better.
- Weed control: Weeds fight with your plants for water. A thick layer of mulch keeps weeds from growing, which means that more water gets to your plants instead of to weeds.
- Mulch helps keep topsoil from washing away during heavy rain and lets water sink in slowly instead of flowing off.
- I have measured the difference in my yard. During the hottest part of summer, beds with the right mulch only need to be watered about half as often as beds without mulch. That’s a huge savings in time, water, and work, plus the plants in the mulched beds look a lot better.
One additional thing I want to say about mulch is that it helps your garden look outstanding. A neat coating of mulch makes beds look polished and well-kept, something bare dirt can’t do. It’s one of those uncommon gardening methods where the practical and aesthetic benefits work together nicely.
The Ice Cube Slow-Release Method for Container Plants and Delicate Outdoor Plants
When you first hear about this hack, it sounds almost crazy, and I have to admit that I thought so too. However, it works exceptionally well, particularly for hanging baskets, outdoor container plants, and delicate plants that can suffer from excessive water.
Instead of putting water directly onto your potted outside plants, the idea is to put ice cubes on the ground and let them melt gently.
Please don’t skip this step because you think it’s a gimmick. Let me explain the science and usefulness behind it, because it answers many actual difficulties that outside container gardeners have every day.
Problem #1: Water drains too quickly through the pot.
You know how frustrating it is when you water a potted plant and the water pours out of the drainage holes in just a few seconds. When potting soil dries up entirely, which happens quickly in outdoor pots that are in the sun and wind, it can become hydrophobic, which means it pushes water away. The water goes directly through the holes between the pot walls and the shrinking soil without being absorbed.
This is a wonderful way to fix it. The earth can soak up the small amount of water that is released at any particular time before more water comes. It’s gradual enough that even soil that doesn’t like water has time to rehydrate and start soaking up moisture again.
Problem #2: Too much water and root rot.
Plants in pots are more likely to get root rot because they don’t have much room to move around. If you dump a lot of water on them all at once, the soil can become too wet and the roots can die. It is almost impossible to overwater plants when you use ice cubes to provide them water.
Problem 3: Splashing dirt and spreading germs.
When you water container plants from above, the soil typically splashes up onto the lower leaves. One of the main ways that soilborne illnesses spread to plant leaves is by this soil splash. There is no splash when ice cubes melt in place.
How to do things the right way:
The size of your container and plant will determine how many ice cubes you need:
- For small pots (6 inches or less), use 2 to 3 ice cubes.
- Four to six ice cubes go in medium pots (8 to 12 inches).
- For big pots (14 inches and up), use 6 to 10 ice cubes.
- 4 to 6 ice cubes in hanging baskets
Put the ice cubes on the ground around the plant, making sure they are uniformly spaced. Don’t put them against the stem. Allow them to melt on their own.
Things to think about:
Many people worry that ice cubes would shock plant roots with chilly water. In actual life, the temperature isn’t a big deal for most outside plants, especially when it’s warm out. The meltwater has warmed up a lot by the time it gets to the roots through the soil. The amount of cold water that comes from a few ice cubes is so minimal compared to the soil mass that it doesn’t really change the temperature in the root zone.
That being said, I wouldn’t use this strategy on tropical plants that don’t like the cold or when the weather is already cool and the soil is frigid. Use your head. This trick is excellent for hot summer days when your outdoor containers are burning in the heat and require a mild, effective way to stay hydrated.
When this trick truly works:
This technique is my favorite way to plant herbs outside. Basil, cilantro, and parsley are picky about how much water they get. They would rather not be too wet or too dry, and they can get fungal problems from splashing. The ice cube method provides the perfect amount of gentle, consistent hydration, avoiding the problems associated with traditional watering methods.
It’s also a lifesaver for hanging baskets, which are difficult to water correctly. They dry out rapidly, water flows through them quickly, and they’re frequently in places where you can’t readily regulate where the water travels. Putting ice cubes in hanging baskets in the morning lets them drink slowly and steadily as the day gets warmer.
An innovative way to use this hack:
You may make the ice cube method even better by freezing diluted liquid fertilizer into your ice cubes. Pour your standard liquid fertilizer into ice cube trays, but only use half the amount that is advised. When you place these cubes on your container plants, they will slowly release both water and nutrients. Your plants will be grateful to you for it.
Bringing It All Together
These four hacks are not difficult to do. You don’t need to spend a lot of money on tools or go to school to learn about plants. But they change the way most people think about watering their outdoor plants in a big way.
Let me go over it again:
- The Deep Soak Method: Water less often but more thoroughly to help roots grow deep and strong.
- Buried Bottle Irrigation: Recycled bottles can be used as free, non-evaporating drip irrigation systems that send water straight to the roots.
- Mulch Moisture Lock: Put 3 to 4 inches of organic mulch on top of soil that has already been moistened. This will keep moisture in and make the soil healthier over time.
- Ice Cube Slow-Release: Use ice cubes to water sensitive plants and outdoor containers slowly and carefully.
What I like about these tactics is that they work with nature instead of against it. They respect how plants grow and take in water on their own. They cut down on waste. They cut down on time. And they make plants that are noticeably healthier, more prolific, and more beautiful.
What I like best is You can start using all of these hacks right away. Right now. You don’t have to buy anything. You don’t have to wait for the correct time of year. Go outside, look at your plants, and get started.
Your garden and your water bill will both be happy.
Final Thoughts
One of the few hobbies where learning more makes things easier is gardening. At first, I made everything difficult. I was anxious about when to water, how much it would cost to install an irrigation system, and what kinds of soil amendments to use.
After years of learning, I’ve come to the conclusion that the simplest methods are usually the best ones—those that work with nature instead of trying to change it.
These four irrigation tips show that this is true. They’re easy to do, cost little or nothing, and work really well. I’ve given them to dozens of friends and fellow gardeners over the years, and they all say the same thing: “Why didn’t someone tell me this sooner?”
Someone has now told you. The rest is up to you.
Put your hands in the soil. Your plants are waiting.
Did you find these tips for irrigation useful? Send this post to a gardener friend who could use these recommendations, and please leave a comment below with your watering tips. Have fun planting!